qBittorrent - Basic Setup
This basic example is based on the use of docker images
Keep in mind the path are setup so it works with hardlinks and instant moves.
More info HERE
The default path setup suggested by some docker developers that encourages people to use mounts like /movies, /tv and /downloads is very suboptimal and it makes them look like two or three file systems, even if they aren’t (Because of how Docker’s volumes work). It is the easiest way to get started. While easy to use, it has a major drawback. Mainly losing the ability to hardlink or instant move, resulting in a slower and more I/O intensive copy + delete is used.
But you're able to change this, by not using the pre-defined/recommended paths like:
/downloads=>/data/downloads,/data/usenet,/data/torrents/movies=>/data/media/movies/tv=>/data/media/tv
Note
Settings that aren't covered means you can change them to your own liking or just leave them on default.
Downloads
Tools => Options => Downloads (Or click on the cogwheel to access the options)
When adding a torrent
-
For consistency with other torrents I recommend leaving this on
Original.Suggested:
Original -
Delete the .torrent file after it has been added to qBittorrent.
Suggested:
Personal preference -
Pre-allocated disk space for the added torrents, this limits fragmentation and also makes sure if you use a cache drive or a feeder disk that the space is available.
Suggested:
EnabledWarning
Do not set Pre-allocated disk space if you are using ZFS as your filesystem as ZFS does not support fallocate
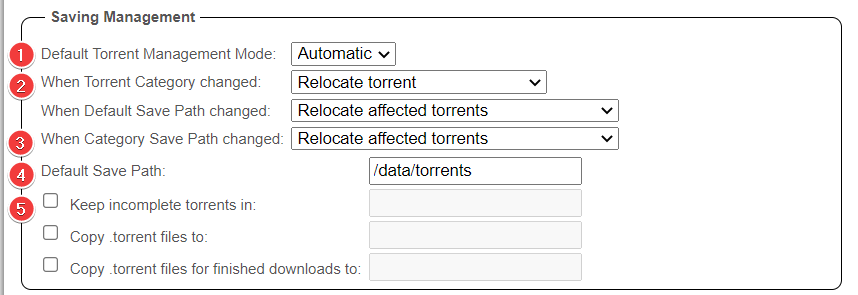
Saving Management

-
Make sure this is set to
Automatic. Your downloads will not go into the category folder otherwise.Suggested:
Automatic -
This helps you to manage your file location based on categories.
Suggested:
Enabled -
Same as
Step 2Suggested:
Enabled -
Your download root path (Download folder/location).
Read the
ATTENTIONblock below -
If you enable this, your incomplete downloads will be placed in this directory until completed. This could be useful if you want your downloads to use a separate SSD/Feeder disk1, but this also results in extra unnecessary moves or in worse cases a slower and more I/O intensive copy + delete.
Suggested:
Personal preference
ATTENTION
ATTENTION
- You set your download location in your download client
- Your download client ONLY downloads to your download folder/location.
- And you tell Radarr where you want your clean media library
- Radarr imports from your download location (copy/move/hardlink) to your media folder/library
- Plex, Emby, JellyFin or Kodi should ONLY have access to your media folder/library
Your Download and Media Library should be NEVER the same locations
Connection
Listening Port
-
Set this to TCP for the best performance
Suggested:
TCP -
Your port used for incoming connections, this is the port you opened in your router/firewall or port forwarded at your VPN provider to make sure you're connectable.
Suggested:
The port you opened in your router/firewall or port forwarded at your VPN provider -
This should be disabled in your router for several security reasons.
Suggested:
Disabled -
Make sure this is disabled so you don't mess up the forwarded port.
Suggested:
Disabled
Connections Limits
The best settings for this depends on many factors so I won't be covering this.
Suggested: personal preference based on your setup and connection.
Proxy Server
This is where you would add for example your SOCKS5 settings from your VPN provider.
Suggested: I personally don't recommend this unsecure option being it's un-encrypted and only spoofs your IP.
Speed
Global Rate Limits
Here you can set your global rate limits, meaning your maximum download/upload speed used by qBittorrent. (For all torrents)
The best settings depends on many factors.
- Your ISP speed.
- Your hardware used.
-
Bandwidth needed by other services in your home network.
Suggested:
For a home connection that you use with others it's best practice to set the upload/download rate to about 70-80% of your maximum upload/download speed.
Alternative Rate Limits
When enabled, it basically does the same as above, but with the option to setup a schedule.
Examples:
- Limit your upload/download rate during daytime when you make most use of it, and unlimited it during nighttime when no one is using the connection.
-
If you have an internet connection that's limited during specific hours (unlimited bandwidth during the night, but limited during the day)
Suggested:
Personal preference
Rate Limits Settings
Not going to cover the technical part of what it does, but the following settings are recommended for best speeds (in most cases).
-
Prevents you from being flooded if the uTP protocol is used for any reason.
Suggested:
Enabled -
Apply rate limit to transport overhead
Suggested:
Disabled -
Apply rate limit to peers on LAN
Suggested:
Enabled
Bittorrent
Privacy
-
These settings are mainly used for public trackers (and should be enabled for them) and not for private trackers, decent private trackers use a private flag where they ignore these settings.
Suggested:
Personal preference -
Recommended setting
Allow encryptionrather than enforcing it allows more peers to connect and is recommended on underpowered systems as it will allow for lower overhead.Suggested:
Allow encryption -
Anonymous mode hides clients (qBittorrent) fingerprint from the peer-ID, sets the ‘User-Agent’ to Null and it doesn’t share your IP-address directly with trackers (though peers will still see your IP address). If using private trackers, it's recommended to
disablethis. I also got reports from people who are using this that they had worse speeds.Suggested:
Disabled
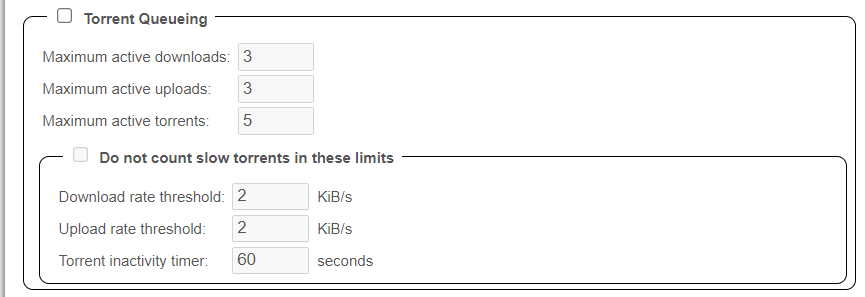
Torrent Queueing
These options allow you to control the number of active torrents being downloaded and uploaded.
Suggested: personal preference based on your setup and connection.
Seeding Limits
-
Your maximum seeding ratio preference. (When both ratio and seeding time are enabled it will trigger the action on whatever happens first.)
Suggested:
Disabled -
Your maximum seeding time preference (When both ratio and seeding time are enabled it will trigger the action on whatever happens first.)
Suggested:
Disabled -
What to do when ratio or seeding time is reached.
Suggested:
Paused and Disabled
Tip
Personally, I recommend using the seeding goals in your Starr Apps indexer settings (enable advanced), or use qBit Manage
Automatically add these trackers to new downloads
Recommendation: Disabled
Warning
NEVER USE THIS OPTION ON (Semi-)PRIVATE TRACKERS
Web UI
Authentication
- When enabled there will be no authentication required for clients on localhost.
- When enabled there will be no authentication required for clients in the
step.3whitelist. - Add all IP subnets that you want to bypass authentication.
Security
-
In some cases when this is enabled it could result in issues.
Suggested:
Disabled
Questions or Suggestions?
If you have questions or suggestions click the chat badge to join the Discord Support Channel where you can ask your questions directly and get live support.
-
If you use unRaid then you don't need this since you can make use of the default cache drive option. ↩


