
![GitHub package.json version]
![GitHub license]
![GitHub last commit]
![Lines of code]
![GitHub Repo stars]
[![Discord badge]][Discord invite]
**ass** is a self-hosted ShareX upload server written in Node.js. I initially started this project purely out of spite.
ass aims to be as **unopinionated** as possible. It allows nearly endless choice for users & hosts alike: Users can configure their upload settings directly from the ShareX interface (including embeds, webhooks, & more), while hosts are free to pick their preferred storage & data management methods.
By default, ass comes with a resource viewing page, which includes metadata about the resource as well as a download button & inline viewers for images, videos, & audio. It does **not** have a user dashboard or registration system: **this is intentional!** Developers are free to [create their own frontends] using the languages & tools they are most comfortable with. Writing & using these frontends is fully documented below, in the wiki, & in the source code.
#### Developers ❤
ass was designed with developers in mind. If you are a developer & want something changed to better suit you, let me know & we'll see what we can do!
[GitHub package.json version]: https://img.shields.io/github/package-json/v/tycrek/ass?color=fd842d&style=for-the-badge
[GitHub license]: https://img.shields.io/github/license/tycrek/ass?color=FD7C21&style=for-the-badge
[GitHub last commit]: https://img.shields.io/github/last-commit/tycrek/ass?color=FD710D&style=for-the-badge
[Lines of code]: https://img.shields.io/tokei/lines/github/tycrek/ass?color=F26602&label=LINES&style=for-the-badge
[GitHub Repo stars]: https://img.shields.io/github/stars/tycrek/ass?color=DE5E02&style=for-the-badge
[Discord badge]: https://img.shields.io/discord/848274994375294986?label=Support%20server&logo=Discord&logoColor=FFF&style=for-the-badge
[Discord invite]: https://discord.gg/wGZYt5fasY
[create their own frontends]: #custom-frontends
## Code quality
| [CodeQL] | [DeepSource] |
| :---------------------------------------: | :----------------------------------: |
| [![CodeQL badge]][CodeQL link] | [![DeepSource Active Issues]][DeepSource Repo] [![DeepSource Resolved Issues]][DeepSource Repo] |
[CodeQL]: https://codeql.github.com/docs/
[DeepSource]: https://deepsource.io/
[CodeQL badge]: https://github.com/tycrek/ass/actions/workflows/codeql-analysis.yml/badge.svg?branch=master
[CodeQL link]: https://github.com/tycrek/ass/actions/workflows/codeql-analysis.yml
[DeepSource Active Issues]: https://deepsource.io/gh/tycrek/ass.svg/?label=active+issues
[DeepSource Resolved Issues]: https://deepsource.io/gh/tycrek/ass.svg/?label=resolved+issues
[DeepSource Repo]: https://deepsource.io/gh/tycrek/ass/?ref=repository-badge
## Features
#### For users
- Upload images, gifs, videos, audio, & files
- Token-based authentication
- Download & delete resources
- Fully customizable Discord embeds
- Built-in web viewer with video & audio player
- Embed images, gifs, & images directly in Discord
- Personal upload log using customizable Discord Webhooks
- macOS/Linux support with alternative clients such as [Flameshot] ([script for ass]) & [MagicCap]
- **Multiple URL styles**
- [ZWS]
- Mixed-case alphanumeric
- Gfycat
- Original
#### For hosts & developers
- Usage metrics
- Thumbnail support
- Mimetype blocking
- Basic multi-user support
- Configurable global upload size limit (per-user coming soon)
- Custom pluggable frontends using [Git Submodules]
- Run locally or in a Docker container
- **Multiple file storage methods**
- Local file system
- Amazon S3, including [DigitalOcean Spaces]
- **Multiple data storage methods** using [data engines]
- **File**
- JSON (default, [papito])
- YAML (soon)
- **Database**
- PostgreSQL ([ass-psql])
- MongoDB ([ass-mongoose][GH AMongoose])
- MySQL (soon)
[Git Submodules]: https://git-scm.com/book/en/v2/Git-Tools-Submodules
[ZWS]: https://zws.im
[DigitalOcean Spaces]: https://www.digitalocean.com/products/spaces/
[data engines]: #data-engines
[papito]: https://github.com/tycrek/papito
[ass-psql]: https://github.com/tycrek/ass-psql
[Flameshot]: https://flameshot.org/
[script for ass]: #flameshot-users-linux
[MagicCap]: https://magiccap.me/
### Access types
| Type | What is it? |
| ---- | ----------- |
| **[Zero-width spaces][ZWS]** | When pasted elsewhere, the URL appears to be *just* your domain name. Some browsers or sites may not recognize these URLs (Discord **does** support these)
![ZWS sample] |
| **Mixed-case alphanumeric** | The "safe" mode. URL's are browser safe as the character set is just letters & numbers. |
| **Gfycat** | Gfycat-style ID's (for example: `https://example.com/unsung-discrete-grub`). Thanks to [Gfycat] for the wordlists |
| **Original** | The "basic" mode. URL matches the same filename as when the file was uploaded. This may be prone to conflicts with files of the same name. |
[ZWS sample]: https://user-images.githubusercontent.com/29926144/113785625-bf43a480-96f4-11eb-8dd7-7f164f33ada2.png
[Gfycat]: https://gfycat.com
## Installation
[Docker](#docker) is the recommended way to install ass, but you can also install it locally.
1. You should have **Node.js 14** & **npm 7 or later** installed.
2. Clone this repo using `git clone https://github.com/tycrek/ass.git && cd ass/`
3. Run `npm i` to install the required dependencies
5. Run `npm start` to start ass.
The first time you run, the setup process will automatically be called and you will be shown your first authorization token; save this as you will need it to configure ShareX.
## Docker
Expand for steps to install with Docker & docker-compose
[docker-compose] is now the recommended way to install ass. These steps assume you are already family with Docker, so if you're not, please [read the docs]. It also assumes that you have a working Docker installation with `docker-compose` installed.
[docker-compose]: https://docs.docker.com/compose/
[read the docs]: https://docs.docker.com/
### Install using docker-compose
1. Clone the ass repo using `git clone https://github.com/tycrek/ass.git && cd ass/`
2. Run the command that corresponds to your OS:
- **Linux**: `./install/docker-linux.sh` (uses `#!/bin/bash`)
- **Windows**: `install/docker-windows.bat` (from Command Prompt)
- These scripts are identical using the equivalent commands in each OS.
3. Work through the setup process when prompted.
The upload token will be printed at the end of the setup script prompts. This is the token that you'll need to use to upload resources to ass. It may go by too quickly to copy it, so just scroll back up in your terminal after setup or run `cat auth.json`.
You should now be able to access the ass server at `http://localhost:40115/` (ass-docker will bind to host `0.0.0.0` to allow external access). You can configure a reverse proxy (for example, [Caddy]; also check out [my tutorial]) to make it accessible from the internet with automatic SSL.
#### What is this script doing?
It creates directories & files required for `docker-compose` to work. It then calls `docker-compose` to build the image & run ass. On first run, ass will detect an empty config file, so it will run the setup script in a headless terminal with no possible input. Luckily, you can use `docker-exec` to start your *own* terminal in which to run the setup script (the install scripts call this for you). After setup, the container is restarted & you are prompted to open logs so you can confirm that the setup was successful. Each install script also has comments for every step, so you can see what's going on.
#### How do I run the npm scripts?
Since all 3 primary data files are bound to the container with Volumes, you can run the scripts in two ways:
```bash
# Use docker-compose exec to check the usage metrics
docker-compose exec ass npm run metrics
# Use docker-compose exec to run the setup script
docker-compose exec ass npm run setup && docker-compose restart
# Run npm on the host to run the setup script (also works for metrics)
# (You will have to meet the Node.js & npm requirements on your host)
npm run setup && docker-compose restart
```
#### How do I update?
Easy! Just pull the changes & run this one-liner:
```bash
# Pull the latest version of ass
git pull
# Rebuild the container with the new changes (uncomment the 2nd part if the update requires refreshing the config)
docker-compose up --force-recreate --build -d && docker image prune -f # && docker-compose exec ass npm run setup && docker-compose restart
```
- `--force-recreate` will force the container to rebuild
- `--build` will build the image from the latest changes in the directory
- `-d` will run the container in the background
- `docker image prune -f` will remove old images that are no longer used by any containers
- *These descriptions were suggested by [CoPilot], feel free to revise if necessary.*
#### What else should I be aware of?
- `docker-compose` exposes **five** volumes. These volumes let you edit the config, view the auth or data files, or view the `uploads/` folder from your host.
- `uploads/`
- `share/` (for future use)
- `config.json`
- `auth.json`
- `data.json`
- I have personally tested running using these commands (migrating from an existing local deployment!) with Digital Ocean Spaces (S3 object-storage), a PostgreSQL database, & a custom frontend all on the same container. It should also work for you but feel free to let me know if you have any issues.
## Using HTTPS
For HTTPS support, you must configure a reverse proxy. I recommend Caddy but any reverse proxy should work (such as Apache or Nginx). I also have a [tutorial on easily setting up Caddy][my tutorial] as a reverse proxy server.
[Caddy]: https://caddyserver.com/
[my tutorial]: https://jmoore.dev/tutorials/2021/03/caddy-express-reverse-proxy/
### Generating new tokens
If you need to generate a new token at any time, run `npm run new-token `. This will **automatically** load the new token so there is no need to restart ass. Username field is optional; if left blank, a random username will be created.
### Cloudflare users
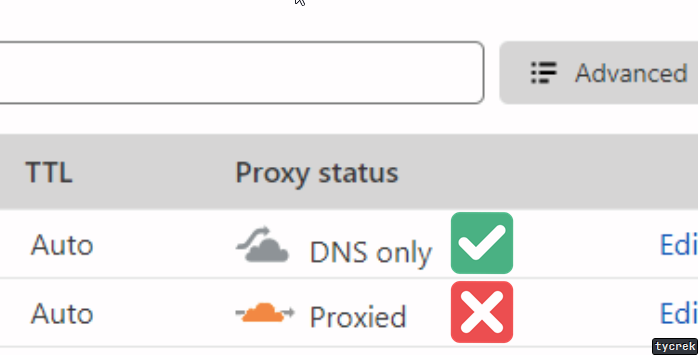
In your Cloudflare DNS dashboard, set your domain/subdomain to **DNS Only** if you experience issues with **Proxied**.
>  ## Configure ShareX
1. Add a new Custom Uploader in ShareX by going to `Destinations > Custom uploader settings...`
2. Under **Uploaders**, click **New** & name it whatever you like.
3. Set **Destination type** to `Image`, `Text`, & `File`
4. **Request** tab:
- Method: `POST`
- URL: `https://your.domain.name.here/`
- Body: `Form data (multipart/form-data)`
- File from name: `file` (literally put "`file`" in the field)
- Headers:
- Name: `Authorization`
- Value: (the value provided by `npm start` on first run)
5. **Response** tab:
- URL: `$json:.resource$`
- Thumbnail: `$json:.thumbnail$`
- Deletion URL: `$json:.delete$`
- Error message: `$response$`
- MagicCap users: **do not** include the `.` in the above (i.e. `$json:resource$`)
6. The file `sample_config.sxcu` can also be modified & imported to suit your needs
### Header overrides
If you need to override a specific part of the config to be different from the global config, you may do so via "`X`" HTTP headers:
| Header | Purpose |
| ------ | ------- |
| **`X-Ass-Domain`** | Override the domain returned for the clipboard (useful for multi-domain hosts) |
| **`X-Ass-Access`** | Override the generator used for the resource URL. Must be one of: `original`, `zws`, `gfycat`, or `random` ([see above](#access-types)) |
| **`X-Ass-Gfycat`** | Override the length of Gfycat ID's. Defaults to `2` |
### Fancy embeds
If you primarily share media on Discord, you can add these additional (optional) headers to build embeds:
| Header | Purpose |
| ------ | ------- |
| **`X-Ass-OG-Title`** | Large text shown above your media |
| **`X-Ass-OG-Description`** | Small text shown below the title but above the media (does not show up on videos) |
| **`X-Ass-OG-Author`** | Small text shown above the title |
| **`X-Ass-OG-Author-Url`** | URL to open when the Author is clicked |
| **`X-Ass-OG-Provider`** | Smaller text shown above the author |
| **`X-Ass-OG-Provider-Url`** | URL to open when the Provider is clicked |
| **`X-Ass-OG-Color`** | Colour shown on the left side of the embed. Must be one of `&random`, `&vibrant`, or a hex colour value (for example: `#fe3c29`). Random is a randomly generated hex value & Vibrant is sourced from the image itself |
#### Embed placeholders
You can insert certain metadata into your embeds with these placeholders:
| Placeholder | Result |
| ----------- | ------ |
| **`&size`** | The files size with proper notation rounded to two decimals (example: `7.06 KB`) |
| **`&filename`** | The original filename of the uploaded file |
| **`×tamp`** | The timestamp of when the file was uploaded (example: `Oct 14, 1983, 1:30 PM`) |
### Webhooks
You may use Discord webhooks as an easy way to keep track of your uploads. The first step is to [create a new Webhook]. You only need to follow the first section, **Making a Webhook**. Once you are done that, click **Copy Webhook URL**. Finally, add these headers to your custom uploader:
| Header | Purpose |
| ------ | ------- |
| **`X-Ass-Webhook-Url`** | The **Webhook URL** you copied |
| **`X-Ass-Webhook-Username`** | (Optional) the "username" of the Webhook; can be set to whatever you want |
| **`X-Ass-Webhook-Avatar`** | (Optional) URL to an image to use as the Webhook avatar. Use the **full** URL including `https://` |
Webhooks will show the filename, mimetype, size, upload timestamp, thumbail, & a link to delete the file. To disable webhooks, simply remove the headers from your config.
[create a new Webhook]: https://support.discord.com/hc/en-us/articles/228383668-Intro-to-Webhooks
## Custom index
By default, ass directs the index route `/` to this README. Follow these steps to use a custom index:
1. Run `npm run setup` to re-run the setup script.
- The defaults are set by your existing config, so you can press `Enter` to accept the defaults on most prompts.
- The one setting you want to change is `Filename for your custom index`. Enter a name for your index, including `.js` (custom index's must be `.js` files).
2. Make a new file matching the name you entered.
3. Your index file needs to export a single function taking three arguments: `(req, res, next)`. Some code samples for common use cases are provided below.
4. Restart ass. The startup info logs should say **`Custom index:`**` enabled`.
### Custom index code samples
**Redirect to a custom frontend registration page**
```js
module.exports = (req, res, next) => res.redirect('/register');
```
**Send an HTML file**
```js
const path = require('path');
module.exports = (req, res, next) => res.sendFile(path.join(__dirname, 'index.html'));
```
## Custom frontends
ass is intended to provide a strong backend for developers to build their own frontends around. [Git Submodules] make it easy to create custom frontends. Submodules are their own projects, which means you are free to build the router however you wish, as long as it exports the required items. A custom frontend is really just an [Express.js router].
**For a detailed walkthrough on developing your first frontend, [consult the wiki][ctw1].**
[Git Submodules]: https://git-scm.com/book/en/v2/Git-Tools-Submodules
[Express.js router]: https://expressjs.com/en/guide/routing.html#express-router
[ctw1]: https://github.com/tycrek/ass/wiki/Writing-a-custom-frontend
## Data Engines
[Papito data engines] are responsible for managing your data. "Data" has two parts: an identifier & the actual data itself. With ass, the data is a JSON object representing the uploaded resource. The identifier is the unique ID in the URL returned to the user on upload.
[Papito data engines]: https://github.com/tycrek/papito
**Supported data engines:**
| Name | Description | Links |
| :--: | ----------- | :---: |
| **JSON** | JSON-based data storage. On disk, data is stored in a JSON file. In memory, data is stored in a [Map]. This is the default engine. | [GitHub][GH ASE]
## Configure ShareX
1. Add a new Custom Uploader in ShareX by going to `Destinations > Custom uploader settings...`
2. Under **Uploaders**, click **New** & name it whatever you like.
3. Set **Destination type** to `Image`, `Text`, & `File`
4. **Request** tab:
- Method: `POST`
- URL: `https://your.domain.name.here/`
- Body: `Form data (multipart/form-data)`
- File from name: `file` (literally put "`file`" in the field)
- Headers:
- Name: `Authorization`
- Value: (the value provided by `npm start` on first run)
5. **Response** tab:
- URL: `$json:.resource$`
- Thumbnail: `$json:.thumbnail$`
- Deletion URL: `$json:.delete$`
- Error message: `$response$`
- MagicCap users: **do not** include the `.` in the above (i.e. `$json:resource$`)
6. The file `sample_config.sxcu` can also be modified & imported to suit your needs
### Header overrides
If you need to override a specific part of the config to be different from the global config, you may do so via "`X`" HTTP headers:
| Header | Purpose |
| ------ | ------- |
| **`X-Ass-Domain`** | Override the domain returned for the clipboard (useful for multi-domain hosts) |
| **`X-Ass-Access`** | Override the generator used for the resource URL. Must be one of: `original`, `zws`, `gfycat`, or `random` ([see above](#access-types)) |
| **`X-Ass-Gfycat`** | Override the length of Gfycat ID's. Defaults to `2` |
### Fancy embeds
If you primarily share media on Discord, you can add these additional (optional) headers to build embeds:
| Header | Purpose |
| ------ | ------- |
| **`X-Ass-OG-Title`** | Large text shown above your media |
| **`X-Ass-OG-Description`** | Small text shown below the title but above the media (does not show up on videos) |
| **`X-Ass-OG-Author`** | Small text shown above the title |
| **`X-Ass-OG-Author-Url`** | URL to open when the Author is clicked |
| **`X-Ass-OG-Provider`** | Smaller text shown above the author |
| **`X-Ass-OG-Provider-Url`** | URL to open when the Provider is clicked |
| **`X-Ass-OG-Color`** | Colour shown on the left side of the embed. Must be one of `&random`, `&vibrant`, or a hex colour value (for example: `#fe3c29`). Random is a randomly generated hex value & Vibrant is sourced from the image itself |
#### Embed placeholders
You can insert certain metadata into your embeds with these placeholders:
| Placeholder | Result |
| ----------- | ------ |
| **`&size`** | The files size with proper notation rounded to two decimals (example: `7.06 KB`) |
| **`&filename`** | The original filename of the uploaded file |
| **`×tamp`** | The timestamp of when the file was uploaded (example: `Oct 14, 1983, 1:30 PM`) |
### Webhooks
You may use Discord webhooks as an easy way to keep track of your uploads. The first step is to [create a new Webhook]. You only need to follow the first section, **Making a Webhook**. Once you are done that, click **Copy Webhook URL**. Finally, add these headers to your custom uploader:
| Header | Purpose |
| ------ | ------- |
| **`X-Ass-Webhook-Url`** | The **Webhook URL** you copied |
| **`X-Ass-Webhook-Username`** | (Optional) the "username" of the Webhook; can be set to whatever you want |
| **`X-Ass-Webhook-Avatar`** | (Optional) URL to an image to use as the Webhook avatar. Use the **full** URL including `https://` |
Webhooks will show the filename, mimetype, size, upload timestamp, thumbail, & a link to delete the file. To disable webhooks, simply remove the headers from your config.
[create a new Webhook]: https://support.discord.com/hc/en-us/articles/228383668-Intro-to-Webhooks
## Custom index
By default, ass directs the index route `/` to this README. Follow these steps to use a custom index:
1. Run `npm run setup` to re-run the setup script.
- The defaults are set by your existing config, so you can press `Enter` to accept the defaults on most prompts.
- The one setting you want to change is `Filename for your custom index`. Enter a name for your index, including `.js` (custom index's must be `.js` files).
2. Make a new file matching the name you entered.
3. Your index file needs to export a single function taking three arguments: `(req, res, next)`. Some code samples for common use cases are provided below.
4. Restart ass. The startup info logs should say **`Custom index:`**` enabled`.
### Custom index code samples
**Redirect to a custom frontend registration page**
```js
module.exports = (req, res, next) => res.redirect('/register');
```
**Send an HTML file**
```js
const path = require('path');
module.exports = (req, res, next) => res.sendFile(path.join(__dirname, 'index.html'));
```
## Custom frontends
ass is intended to provide a strong backend for developers to build their own frontends around. [Git Submodules] make it easy to create custom frontends. Submodules are their own projects, which means you are free to build the router however you wish, as long as it exports the required items. A custom frontend is really just an [Express.js router].
**For a detailed walkthrough on developing your first frontend, [consult the wiki][ctw1].**
[Git Submodules]: https://git-scm.com/book/en/v2/Git-Tools-Submodules
[Express.js router]: https://expressjs.com/en/guide/routing.html#express-router
[ctw1]: https://github.com/tycrek/ass/wiki/Writing-a-custom-frontend
## Data Engines
[Papito data engines] are responsible for managing your data. "Data" has two parts: an identifier & the actual data itself. With ass, the data is a JSON object representing the uploaded resource. The identifier is the unique ID in the URL returned to the user on upload.
[Papito data engines]: https://github.com/tycrek/papito
**Supported data engines:**
| Name | Description | Links |
| :--: | ----------- | :---: |
| **JSON** | JSON-based data storage. On disk, data is stored in a JSON file. In memory, data is stored in a [Map]. This is the default engine. | [GitHub][GH ASE]
[NPM][NPM ASE] |
| **PostgreSQL** | Data storage using a [PostgreSQL] database. [node-postgres] is used for communicating with the database. | [GitHub][GH APSQL]
[NPM][NPM APSQL] |
| **Mongoose** | Data storage using a [MongoDB] database. [mongoose] is used for communicating with the database. Created by [@dylancl] | [GitHub][GH AMongoose]
[NPM][NPM AMongoose] |
[Map]: https://developer.mozilla.org/en-US/docs/Web/JavaScript/Reference/Global_Objects/Map
[GH ASE]: https://github.com/tycrek/papito/
[NPM ASE]: https://www.npmjs.com/package/@tycrek/papito
[PostgreSQL]: https://www.postgresql.org/
[node-postgres]: https://node-postgres.com/
[GH APSQL]: https://github.com/tycrek/ass-psql/
[NPM APSQL]: https://www.npmjs.com/package/@tycrek/ass-psql
[MongoDB]: https://www.mongodb.com/
[mongoose]: https://mongoosejs.com/
[GH AMongoose]: https://github.com/dylancl/ass-mongoose
[NPM AMongoose]: https://www.npmjs.com/package/ass-mongoose
[@dylancl]: https://github.com/dylancl
A Papito data engine implements support for one type of database (or file, such as JSON or YAML). This lets ass server hosts pick their database of choice, because all they'll have to do is enter the connection/authentication details, and ass will handle the rest, using the resource ID as the key.
**~~For a detailed walkthrough on developing engines, [consult the wiki][ctw2].~~ Outdated!**
[`data.js`]: https://github.com/tycrek/ass/blob/master/data.js
[ctw2]: https://github.com/tycrek/ass/wiki/Writing-a-StorageEngine
## npm scripts
ass has a number of pre-made npm scripts for you to use. **All** of these scripts should be run using `npm run ` (except `start`).
| Script | Description |
| ------ | ----------- |
| **`start`** | Starts the ass server. This is the default script & is run with **`npm start`**. |
| `setup` | Starts the easy setup process. Should be run after any updates that introduce new config options. |
| `metrics` | Runs the metrics script. This is a simple script that outputs basic resource statistics. |
| `new-token` | Generates a new API token. Accepts one parameter for specifying a username, like `npm run new-token `. ass automatically detects the new token & reloads it, so there's no need to restart the server. |
| `restart` | Restarts the ass server using `systemctl`. More info soon (should work fine if you have an existing `ass.service` file) |
| `engine-check` | Ensures your environment meets the minimum Node & npm version requirements. |
| `logs` | Uses the [tlog Socket plugin] to stream logs from the ass server to your terminal, with full colour support (Remember to set [`FORCE_COLOR`] if you're using Systemd) |
| `docker-logs` | Alias for `docker-compose logs -f --tail=50 --no-log-prefix ass` |
| `docker-update` | Alias for `git pull && docker-compose up --force-recreate --build -d && docker image prune -f` |
| `docker-resetup` | Alias for `docker-compose exec ass npm run setup && docker-compose restart` |
[tlog Socket plugin]: https://github.com/tycrek/tlog#socket
[`FORCE_COLOR`]: https://nodejs.org/dist/latest-v14.x/docs/api/cli.html#cli_force_color_1_2_3
## Flameshot users (Linux)
Use [this script]. For the `KEY`, put your token. Thanks to [@ToxicAven] for creating this!
[this script]: https://github.com/tycrek/ass/blob/master/flameshot_example.sh
[@ToxicAven]: https://github.com/ToxicAven
## Contributing
Please follow the [Contributing Guidelines] when submiting Issues or Pull Requests.
[Contributing Guidelines]: https://github.com/tycrek/ass/blob/master/CONTRIBUTING.md
## Credits
- [GitHub CoPilot]... seriously, this thing is *good*.
- Special thanks to [hlsl#1359] for the awesome logo!
- [Gfycat] for their wordlists
[CoPilot]: https://copilot.github.com/
[GitHub CoPilot]:https://copilot.github.com/
[hlsl#1359]: http://be.net/zevwolf