|
|
4 years ago | |
|---|---|---|
| .github | 4 years ago | |
| ass-x@72edf80075 | 4 years ago | |
| generators | 4 years ago | |
| routers | 4 years ago | |
| views | 4 years ago | |
| .deepsource.toml | 4 years ago | |
| .gitignore | 4 years ago | |
| .gitmodules | 4 years ago | |
| LICENSE | 4 years ago | |
| MagicNumbers.json | 4 years ago | |
| README.md | 4 years ago | |
| ass.js | 4 years ago | |
| auth.js | 4 years ago | |
| checkEngine.js | 4 years ago | |
| data.js | 4 years ago | |
| flameshot_example.sh | 4 years ago | |
| hash.js | 4 years ago | |
| metrics.js | 4 years ago | |
| package-lock.json | 4 years ago | |
| package.json | 4 years ago | |
| sample_config.sxcu | 4 years ago | |
| setup.js | 4 years ago | |
| storage.js | 4 years ago | |
| thumbnails.js | 4 years ago | |
| utils.js | 4 years ago | |
| vibrant.js | 4 years ago | |
README.md
ass is a self-hosted ShareX upload server written in Node.js. I initially started this project purely out of spite.
Code quality
| CodeQL | DeepSource |
|---|---|
  |
Features
- ✔️ Token authorization via HTTP
Authorizationheader - ✔️ Upload images, videos, gifs, files
- ✔️ Fancy embeds on Discord
- ✔️ Seamless inline video embeds on Discord
- ✔️ Upload log via customizable Discord Webhooks
- ✔️ File deletion
- ✔️ Usage metrics
- ✔️ Thumbnail support
- ✔️ Basic multi-user support
- ✔️ Configurable global upload limit (per-user coming soon!)
- ✔️ Local storage or block-storage support for Amazon S3 (including DigitalOcean Spaces)
- ✔️ Custom pluggable frontend dashboards using Git Submodules
- ✔️ Multiple access types
- ZWS
- Mixed-case alphanumeric
- Gfycat
- Original
- ❌ Multiple database types
- JSON
- Mongo (soon!)
- MySQL (soon!)
- PostgreSQL (soon!)
Access types
| Type | What is it? |
|---|---|
| ZWS (Zero-width spaces) | The "fancy" mode. When pasted elsewhere, the URL appears to be just your domain name. |
| Mixed-case alphanumeric | The "safe" mode. URL's are browser safe as the character set is just letters & numbers. |
| Gfycat | Gfycat-style ID's (for example: https://gfycat.com/unsungdiscretegrub "unsung discrete grub"). Thanks to Gfycat for the wordlists |
| Original | The "basic" mode. URL matches the same filename as when the file was uploaded. This may be prone to conflicts with files of the same name. |
Installation
The installation may look daunting but it's really pretty straightforward. Just follow it word-for-word & you'll be fine. If you are not fine, then by all means open an Issue & I'll try my best to help.
- First of all you must have Node.js 14 or later & npm 7 or later installed.
- Clone this repo using
git clone https://github.com/tycrek/ass.git && cd ass/ - Run
npm ito install the required dependencies - Run
npm run setupto start the easy configuration - Run
npm startto start the server. The first time you run it you will be shown your first authorization token; save this as you will need it to configure ShareX. - (Optional) You must also configure an SSL-enabled reverse proxy (only if you want to use HTTPS):
- I personally use Caddy, see my tutorial on setting that up
- You may also use Apache or Nginx as reverse proxies
Generating new tokens
If you need to generate a new token at any time, run npm run new-token <username>. This will automatically load the new token so there is no need to restart ass. Username field is optional; if left blank, a random username will be created.
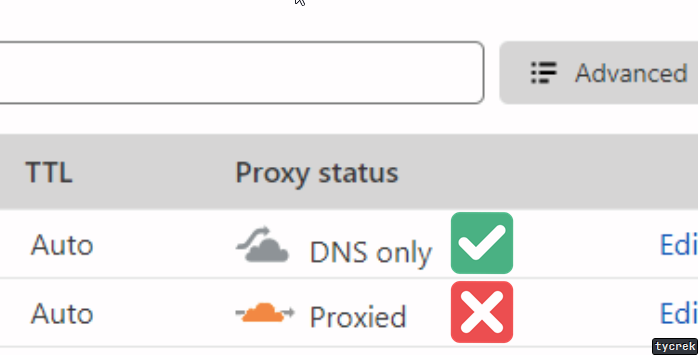
Cloudflare users
In your Cloudflare DNS dashboard, make sure your domain/subdomain is set to DNS Only.
Configure ShareX
- Add a new Custom Uploader in ShareX by going to
Destinations > Custom uploader settings... - Under Uploaders, click New & name it whatever you like.
- Set Destination type to
Image,Text, &File - Request tab:
- Method:
POST - URL:
https://your.domain.name.here/ - Body:
Form data (multipart/form-data) - File from name:
file(literally put "file" in the field) - Headers:
- Name:
Authorization - Value: (the value provided by
npm starton first run)
- Name:
- Method:
- Response tab:
- URL:
$json:.resource$ - Thumbnail:
$json:.thumbnail$ - Deletion URL:
$json:.delete$ - Error message:
$response$ - MagicCap users: do not include the
.in the above (i.e.$json:resource$)
- URL:
- The file
sample_config.sxcucan also be modified & imported to suit your needs
Header overrides
If you need to override a specific part of the config to be different from the global config, you may do so via "X" HTTP headers:
| Header | Purpose |
|---|---|
X-Ass-Domain |
Override the domain returned for the clipboard (useful for multi-domain hosts) |
X-Ass-Access |
Override the generator used for the resource URI. Must be one of: original, zws, gfycat, or random (see above) |
X-Ass-Gfycat |
Override the length of Gfycat ID's. Defaults to 2 |
Fancy embeds
If you primarily share media on Discord, you can add these additional (optional) headers to build embeds:
| Header | Purpose |
|---|---|
X-Ass-OG-Title |
Large text shown above your media |
X-Ass-OG-Description |
Small text shown below the title but above the media (does not show up on videos yet) |
X-Ass-OG-Author |
Small text shown above the title |
X-Ass-OG-Author-Url |
URL to open when the Author is clicked |
X-Ass-OG-Provider |
Smaller text shown above the author |
X-Ass-OG-Provider-Url |
URL to open when the Provider is clicked |
X-Ass-OG-Color |
Colour shown on the left side of the embed. Must be one of &random, &vibrant, or a hex colour value (for example: #fe3c29). Random is a randomly generated hex value and Vibrant is sourced from the image itself |
Embed placeholders
You can insert certain metadata into your embeds with these placeholders:
| Placeholder | Result |
|---|---|
&size |
The files size with proper notation rounded to two decimals (example: 7.06 KB) |
&filename |
The original filename of the uploaded file |
×tamp |
The timestamp of when the file was uploaded (example: Oct 14, 1983, 1:30 PM) |
Webhooks
You may use Discord webhooks as an easy way to keep track of your uploads. The first step is to create a new Webhook. You only need to follow the first section, Making a Webhook. Once you are done that, click Copy Webhook URL. Next, paste your URL into a text editor. Extract these two values from the URL:
https://discord.com/api/webhooks/12345678910/T0kEn0fw3Bh00K
                                 ^^^^^^^^^^  ^^^^^^^^^^^^
                                 Webhook ID  Webhook Token
Once you have these, add the following HTTP headers to your ShareX config:
| Header | Purpose |
|---|---|
X-Ass-Webhook-Client |
The Webhook ID |
X-Ass-Webhook-Token |
The Webhook Token |
X-Ass-Webhook-Username |
(Optional) the "username" of the Webhook; can be set to whatever you want |
X-Ass-Webhook-Avatar |
(Optional) URL to an image to use as the Webhook avatar. Use the full URL including https:// |
Webhooks will show the filename, mimetype, size, upload timestamp, thumbail, and a link to delete the file. To disable webhooks, simply remove the headers from your config.
Dashboard frontends
ass is intended to provide a strong backend for developers to build their own frontends around. The easiest way to do this is with a Git Submodule. Your submodule should be a separate git repo. Make sure you adjust the FRONTEND_NAME to match your frontend. To make updates easier, it is recommended to make a new branch. Since submodules are their own dedicated projects, you are free to build the router however you wish, as long as it exports the required items detailed below.
Sample submodule entry file:
const { name, version } = require('./package.json');
const express = require('express');
const router = express.Router();

router.all('/', (_req, res) => res.send('My awesome dashboard!'));

// These exports are REQUIRED by ass, so don't forget to set them!
module.exports = {
	router,                       // The dashboard router itself
	enabled: true,                // Required to activate frontend in ass; DO NOT change unless you want to disable your frontend
	brand: `${name} v${version}`, // Printed in ass logs & reported to client. Can be changed to your liking
	endpoint: '/dashboard'        // URL to use for your dashboard router. ass will automatically set up Express to use this value. Can be changed to your liking
};
Now you should see My awesome dashboard! when you navigate to http://your-ass-url/dashboard.
Disclaimer: custom frontends are still experimental. Currently ass has no API, but I already plan on writing that very soon. For now, you can make your dashboard use const users = require('../auth') & const data = require('../data') (these values are recognized globally throughout ass, so they will stay up-to-date as users upload).
Flameshot users (Linux)
Use this script kindly provided by @ToxicAven. For the KEY, put your token.
Contributing
No strict contributing rules at this time. I appreciate any Issues or Pull Requests.
Credits
- Special thanks to hlsl#1359 for the awesome logo!
- @ToxicAven for the Flameshot script
- Gfycat for their wordlists