11 KiB
Quick Start
Here we're going to explain the basic setup for Notifiarr to get it working with Sonarr, Radarr, Bazarr.
If you want to make use of the other options I suggest to looking at the Notifiarr Wiki{:target="_blank" rel="noopener noreferrer"}.
Login
First we're going to visit the Notifiarr{:target="_blank" rel="noopener noreferrer"} site, if you don't have an account yet, click the link to signup.
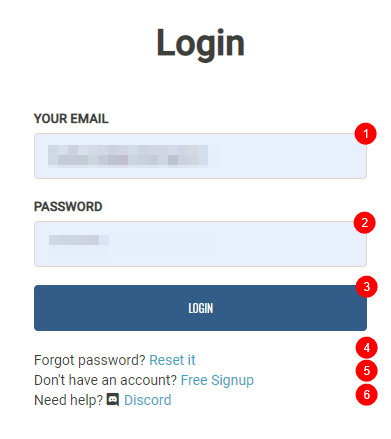
- Your Email address you used during signup.
- Your Password you created during signup.
- Login to the site and setup.
- Password reset if you forgot your password.
- Signup if you don't have an account.
- Link to Notifiarr Discord support channel.
Profile
After you have logged in, you will be redirected to your profile screen.

- Click on
Generate API Key(This needs to be done) - Select your
Country - Select your
Timezone - Change your
Time Formatto your liking - Select your
Site Theme - Select your
Notification Language - If you decide to delete your account, check the box
- Don't forget to
Saveyour changes
Integration Setup
- Enable the integrations you want to use
- Setup your discord server (required), invite the bot (required) and reactions (optional).
Integration Settings
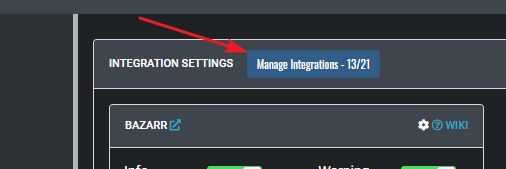
First, click on Manage Integrations so you can enable what you want to receive notifications for.

A screen will popup and here you're able to select from which application/services you receive a notification.
When you enabled the ones you want click on Save
Setup which notifications you want to to receive from each option.
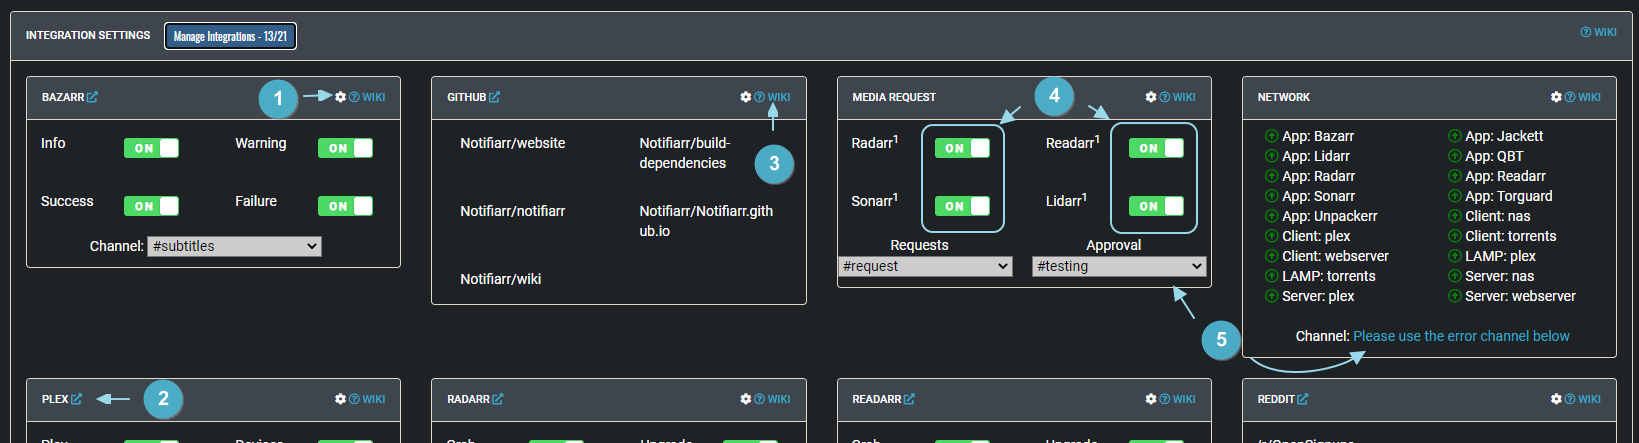
- Cog wheel, this opens the integration settings
- External link, this opens the website for the integration
- WIKI link, this opens any extra wiki information available for the integration
- Triggers, this enables/disables a specific trigger for the integration
- Channels, this sets the channel in your server to post to for the integration
Discord Settings
Here we will cover the following
- Setup the server & shared error channel
- Invite the bot into your server
- Setup reactions
- Setup indexer reactions
Create the channels
First thing to do is create a few channels (in your discord server) where you receive your notifications.
!!! note I won't be explaining how to setup a discord channel, that's up to you but google has plenty of references.
You can do it all from one channel or separate the notifications (granular) for each trigger if you want.
Simple channel setup
#media => All the *arr notifications you setup in Integration Settings.
#errors => Health checks, network errors, etc.
#plex => Play, resume, etc. for Plex.
After you create the needed channels, it's time to add them to the Setup the channels
First we need to get the server ID
Open your User Settings -> Appearance -> Enable Developer Mode.

Right click on your server name and select "Copy ID"
??? example "Example right click"

Paste the server ID in box [1]
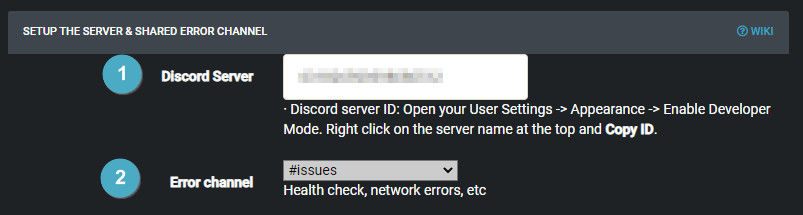
- Add your server ID
- Select the channel for the
#errorschannel.
Invite the bot
It's time to invite the bot in to your Server/Channels by clicking on the following link.

You will get a screen that looks like the following screenshot.
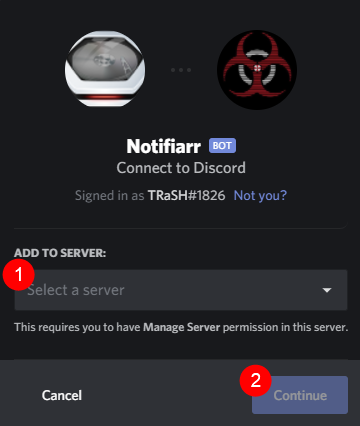
- Select the server the bot should join.
- Click on
Continueto approve.
!!! note Check Discord Permissions){:target="_blank" rel="noopener noreferrer"} for information which permissions the bot needs.
Reactions
Here we will setup the Notifiarr reactions(emoji's) that will be shown during a playback in plex, or during a download/import in Sonarr/Radarr.


This section exist of 2 parts.
- *arr state (grab/failed) and play state of plex.
- The Trackers/Indexers.
First we're going to download the emoji's and you can do that in 2 ways.
- 1 at a time - Right click -> Save As... - for these emoji images to some location on your computer.
- Pack Download - Click here{:target="_blank" rel="noopener noreferrer"} to download a zip of all the current reaction images.
!!! attention
To download the Emoji Pack from the link in this Guide you will need to be logged in to [Notifiarr](https://notifiarr.com/index.php){:target="_blank" rel="noopener noreferrer"} site !!!
Else you can find it on the main Notifiarr site in the `Integration Setup` Category at the bottom right

For this example, we will be using Pack Download. You'll need download the file and then unpack it somewhere on your computer. After which, you can then add the emoji's to your Discord Server easily.
How to add your own Emoji's => LINK{:target="_blank" rel="noopener noreferrer"}
After you've added them to your Discord Server it's time to get the ID's from your emoji's, to do this go in to one of your channels and type:
\:emoji_name:
??? example "Example"

What results in to.

So your ID would be `:grab:706535455876710461`.
Paste the ID results from your channel in to the corresponding boxes.
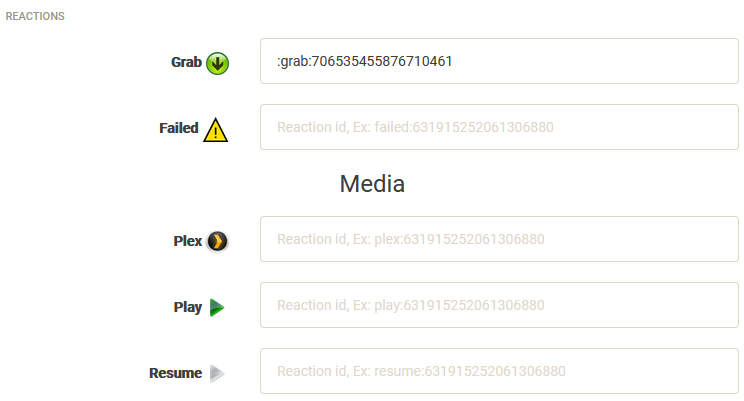
Do this for all the other boxes also including your Trackers/Indexers.
Trackers and Indexers

- Paste here the the emoji ID.
- The actual indexer name you're using in Sonarr/Radarr.
??? example "Example"

What will result in to.

If you use a different name in Sonarr and Radarr just add them with a comma `BeyondHD - Jackett,BHD`.
Don't forget to click on Save Changes !!!
!!! note After pasting the Emoji's ID in to the box you will notice that the leading colon will disappear nothing to worry about that's per design
How to add notifiarr to your applications
Here we will explain how to we add notifiarr to your *arr and Plex.
When you click on the cogwheel of the enabled Integration you will see on the top Instructions

It will show you a short description where and how to add what.
??? example

Radarr, Readarr and Lidarr
Radarr, Readarr and Lidarr supports Notifiarr natively so that's an easy one to add.
Settings => Connect => click on the 
plus icon and select Notifiarr add your API key and you're done.
??? example "Radarr Example"
In Radarr go to Settings => Connect => Click on the plus icon and select notifiarr.

Then add the following info.

1. The name you want to use for the notification.
1. Enable `On Grab`, `On Import`, `On Upgrade`, `On Health Issue` & `Include Health Warnings`.
1. Add here you API key from Notifiarr.
1. Click on `Test` to see if it works.
1. If everything is correct click on `Save`
Sonarr
Sonarr doesn't have native support & will not get one per their devs. That's why we're going to use the webhook method.

Settings => Connect > Click on the plus icon and select Webhook.
Add the following info:
Name: Notifiarr
Enable: On Grab, On Import, On Upgrade, On Health Issue & Include Health Warnings.
URL: The URL that you can copy/paste from the integrations page.
Click Save
??? example "Sonarr Example"
`Settings` => `Connect` > Click on the  `plus` icon and select `Webhook`.

Add the following info.

1. The name you want to use for the notification.
1. Enable `On Grab`, `On Import`, `On Upgrade`, `On Health Issue` & `Include Health Warnings`.
1. Add the URL that you can copy/paste from the integrations page.
1. Make sure this is on `POST`.
1. Click on `Test` to see if it works.
1. If everything is correct click on `Save`
Bazarr
For Bazarr you need to make use of JSON method.
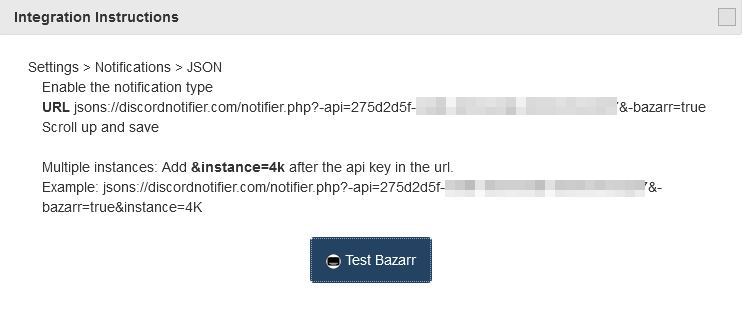
Settings => Notifications => and selectJSON
On the top click on the ![]()
Edit icon and Enable the notification type.
Add the JSON URL that you copy/pasted from the integrations page.
Scroll up and save
??? example "Bazarr Example"
`Settings` => `Notifications` => and select`JSON`

On the top click on the  `Edit` icon and Enable the notification type.
Add the following info.

1. Enable the JSON Notification.
1. Add the JSON URL that you copy/pasted from the integrations page.
1. Click on `Test` to see if it works.
1. If everything is correct click on `Ok`
Don't forget to click on Save on the top of the Bazarr screen.

Plex
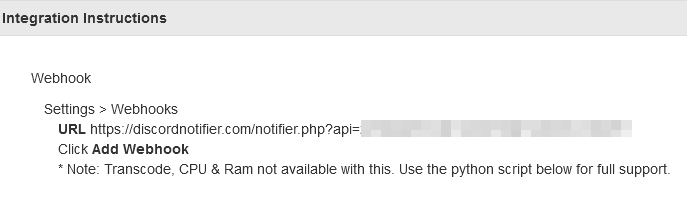
Settings => Webhooks => click on ADD WEBHOOK and add the URL that you can copy/paste from the integrations page and click on SAVE CHANGES
??? example "Plex Example"
`Settings` => `Webhooks` => click on `ADD WEBHOOK`
On the top right click on the  `Settings` icon, and on the left sidebar select `Webhooks`
Click on the middle of the screen on  and add the following info.

1. Add the URL that you can copy/paste from the integrations page.
2. Click on `SAVE CHANGES`
If you want to show more advanced info like Transcode, CPU & Ram take a look at Plex Integration{:target="_blank" rel="noopener noreferrer"}
!!! note If there is still an issue, try asking in the Notifiarr discord channel{:target="_blank" rel="noopener noreferrer"} for additional support.