8.6 KiB
Synology
!!! note
Being I don't have a Synology myself and I kind of hate the Synology GUI for the dockers, I'm doing this with the use of docker-compose.

This works like 10x faster then the GUI and after adding it shows up in the GUI.

Thanks to faxity for the initial compose that I used to create the Synology Guide.
We need to get some information that we need later to setup the docker-compose file.
PUID and PGID
In order for the Docker container to access the shares on the Synology, we need to give it the same permissions as your main user who has access to those shares. For this we need to figure out the PUID and the PGID of the user having access to your shares.
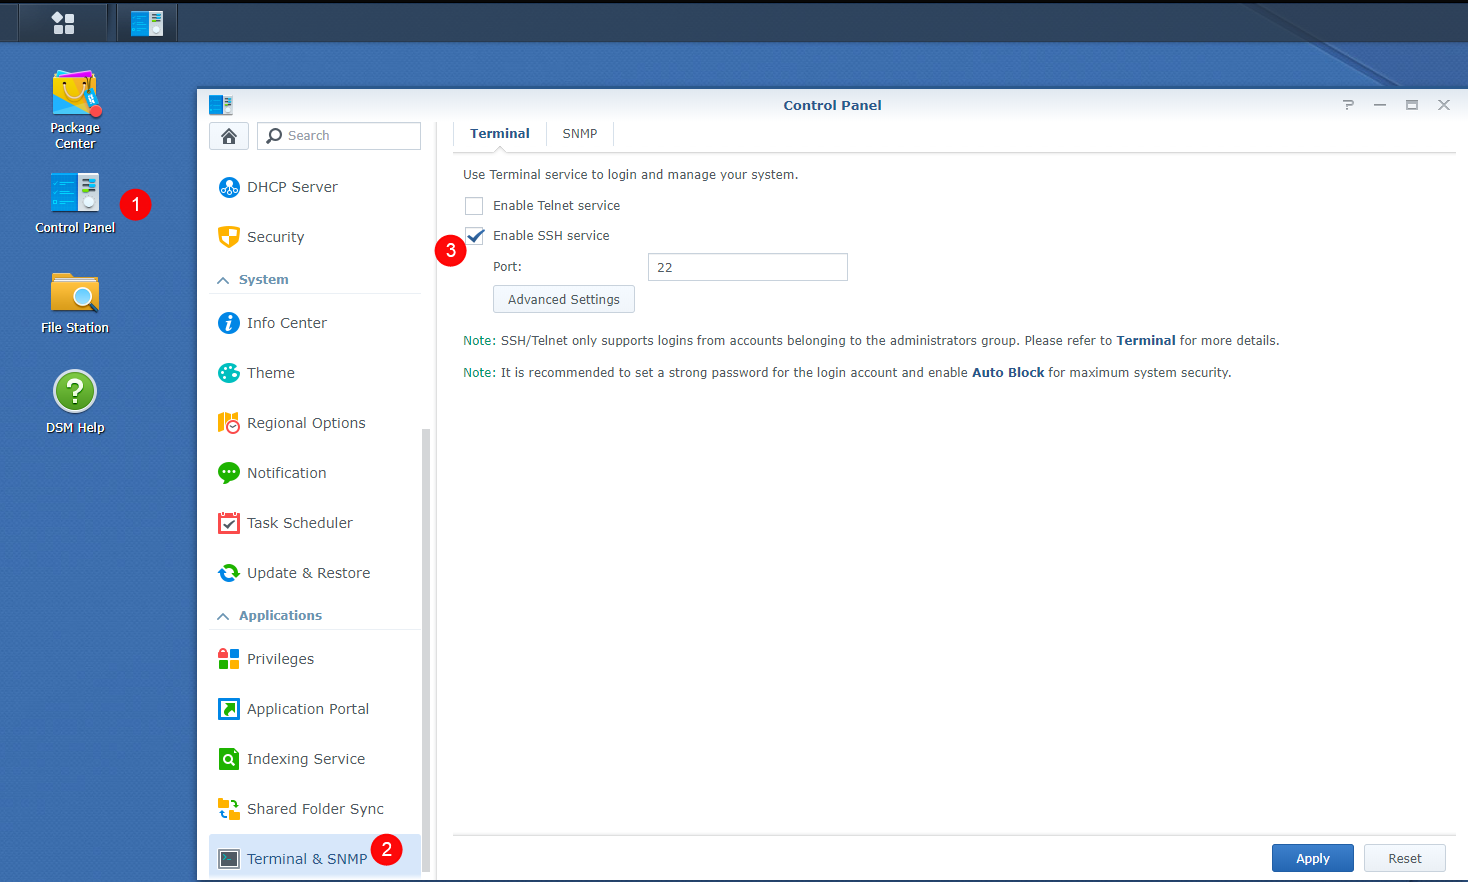
You will need to SSH into your Synology. If you didn't already enable it you need to do that first
Then use a program like Putty and SSH to your Synology.
Login if you get a popup asking if you want to trust the key,
Just press OK or ACCEPT
Enter the login information of your main Synology user account.

Once logged in type id.
This will show your UID (aka PUID).
Which in this screenshot is 1026 for the administrator
and the GID (aka PGID) which is 100 for the users group.
Remember these values for later use.
!!! note
Yes we know it's not recommended to use the admin account but if you already know this then you wouldn't need to read this ;)
Folder Structure
!!! attention
To get Hardlinks and Atomic-Moves working with your Synology you will need to make use of **ONE** share with subfolders.
For this example we're going to make use of a share called data.
On the host (Synology) you will need to add /volume1/ before it. So /volume1/data
The data folder has sub-folders for torrents and usenet and each of these have sub-folders for tv, movie and music downloads to keep things neat. The media folder has nicely named TV, Movies and Music sub-folders, this is your library and what you’d pass to Plex, Emby or JellyFin.
These subfolders you need to create your self.
I'm using lower case on all folder on purpose, being Linux is case sensitive.
data
├── torrents
│  ├── movies
│  ├── music
│  └── tv
├── usenet
│  ├── movies
│  ├── music
│  └── tv
└── media
    ├── movies
    ├── music
    └── tv
--8<-- "includes/hardlinks/breakdown-folder-structure.md"
Appdata
Your appdata will be stored in /volume1/docker/appdata/{appname}
These {appname} sub folders you need to create your self. (This is a limitation of the Synology)
We're going to do this in Putty or a similar program.
sudo mkdir /volume1/docker/appdata
cd /volume1/docker/appdata
sudo mkdir radarr sonarr bazarr plex tautulli pullio
# The following is needed for plex transcode location
sudo mkdir /tmp/plex
??? bug "plex transcode location /tmp/plex - [CLICK TO EXPAND]"
The extra created /tmp/plex folder for plex's transcode location won't survive a reboot.
so you will need to create in your task scheduler a "triggered task" that runs on startup of the nas.
Add the following command as root: `mkdir /tmp/plex/`


If you need extra help please come to [](https://trash-guides.info/discord){:target="_blank" rel="noopener noreferrer"}
So your appdata folder will look like this.
ls -al /volume1/docker/appdata
docker
└── appdata
    ├── radarr
    ├── sonarr
    ├── bazarr
    ├── plex
    ├── pullio
    └── tautulli
Needed files
First we will download the docker-compose.yml file
Download this docker-compose.yml{:target="_blank" rel="noopener noreferrer"} to your /volume1/docker/appdata location so you got your important stuff together.
sudo wget https://raw.githubusercontent.com/TRaSH-/Guides-Synology-Templates/main/docker-compose/docker-compose.yml
??? question "What's included and What's not included - [CLICK TO EXPAND]"
This docker-compose file will have the following docker containers included.

- Radarr
- Sonarr
- Bazarr (Subtitle searcher and downloaded)
- Plex
- Tautulli

What's not included.

I didn't add a downloader to it because it depends on what you prefer usenet/torrents and which client you prefer, so i created a new [Repository](https://github.com/TRaSH-/Guides-Synology-Templates){:target="_blank" rel="noopener noreferrer"} on Github where I provide and maintain some templates that you can find in the `template` folder ready to use with the main `docker-compose.yml`.

The only thing you need to do is copy/paste what's inside the `.yml` file in to the main `docker-compose.yml`, the template also has the command what you need to use to create the [appdata](#appdata) folder that we explained earlier.
Second we will download the .env file
Download this .env{:target="_blank" rel="noopener noreferrer"} to your /volume1/docker/appdata location so you got your important stuff together.
sudo wget https://raw.githubusercontent.com/TRaSH-/Guides-Synology-Templates/main/docker-compose/.env
!!! attention
‼️ MAKE SURE THE FILE KEEPS THE ORIGINAL NAME .env WITH THE DOT BEFORE IT ‼️
Changes you need to do
The .env we downloaded holds the variables/information you need to change so everything works (I added also a description in the .env file)
!!! info ""
The .env holds more variables/information for other containers
- DOCKERCONFDIR (only change this if you know what you're doing and decide to use another path then in this guide used)
- DOCKERDATADIR (only change this if you know what you're doing and decide to use another path then in this guide used)
- PUID/PGID (this info you got earlier from HERE)
- TZ (Change to your timezone)
- Install and Create a task scheduler for Pullio, so your containers stay up to date.
Pullio - Auto update docker-compose the correct way
First you need to download Pullio
   sudo curl -fsSL "https://raw.githubusercontent.com/hotio/pullio/master/pullio.sh" -o /usr/local/bin/pullio
   sudo chmod +x /usr/local/bin/pullio
For Pullio you will need to create in your task scheduler a "triggered task" that runs for example at 4am at night with root privileges.
Add the following 2 lines to your triggered task
/usr/local/bin/pullio > /volume1/docker/appdata/pullio/pullio.log 2>&1
More info about Pullio HERE{:target="_blank" rel="noopener noreferrer"}
Permissions
Now we need to make sure that the newly created files and folders have the correct permissions.
!!! note
If you're using another user then admin then you need to change it in the commands below !!!
sudo chown -R admin:users /volume1/data /volume1/docker
sudo chmod -R a=,a+rX,u+w,g+w /volume1/data /volume1/docker
Run the Docker Compose
!!! important make sure you deleted/removed all your existing dockers from the GUI and also remove your native installs of these applications !!!
When you did all the above steps you only need to type the following in your /volume1/docker/appdata
cd /volume1/docker/appdata
sudo docker-compose up -d
You will notice that all the images will be downloaded, and after that the containers will be started. If you get a error then look at the error what it says and try to fix it. If you still got issues then put your used docker-compose.yml on 0bin{:target="_blank" rel="noopener noreferrer"} and join the guides-discord here{:target="_blank" rel="noopener noreferrer"} and provide the pastebin link with the error, have patience because of timezone differences.
Don't forget to look at the Examples how to setup the paths inside your applications.
!!! attention
If you need to do any changes only edit the `docker-compose.yml` file and activate the changes when you type `sudo docker-compose up -d` again.

Any changes you do/did in the GUI will be reverted when you run the docker-compose.

Just don't use the GUI !!!
--8<-- "includes/hardlinks/docker-compose-commands.md"