15 KiB
Synology
!!! note
Being I don't have a Synology myself and I kind of hate the Synology GUI for the dockers, I'm doing this with the use of docker-compose through a terminal.

This is faster than the GUI and after installing, it shows up in the Docker GUI.

Thanks to faxity for the initial compose that I used to create the Synology Guide.

And a very big thanks to [Bokkoman](https://www.buymeacoffee.com/bokkoman){:target="_blank" rel="noopener noreferrer"} and [BZwart](https://github.com/BaukeZwart){:target="_blank" rel="noopener noreferrer"} that updated this Guide for DSM 7 and also offered their help on discord as Synology Support Team.
Introduction
This page will provide you with guidance on how to install several Docker images to your Synology system. We highly recommend to read the full guide, that way you have a better understanding of what you do, in case you later decide to make changes.
Automated Script
??? example "Automated script (‼️Use this script at your own risk‼️) - [CLICK TO EXPAND]"
!!! Warning
Though, we offer a short way out. This is intended as a quick way to do everything that is written on this page within one script. And is only for initial setup. After that, you need to manage it yourself. Rerunning the script will reset all personal changes made in the compose/env.
The script is only tested on Synology DSM7 and higher.
**:bangbang: We are not held reliable if anything breaks on your system. Use at your own risk :bangbang:**
To get this working you will need to enable terminal access (SSH) and home folders.
Be sure to delete current running Docker containers related to this guide (ie. *arr apps, download clients), backup settings before you do.
To enable SSH on your Synology take a look [HERE](#ssh){:target="_blank" rel="noopener noreferrer"}.
To enable Home folders, go to `Control Panel` > `User & Group` > `Advanced` > `Enable user home service` at the bottom.

When you enabled these two settings, run the following commands in your favorite terminal app and follow the onscreen questions.
```bash
curl -sL git.io/syno-script > ~/syno-script
```
```bash
sudo bash ~/syno-script
```
Install Docker
You need to install Docker from the Package Center. This should also create a share named docker, check File Station if it is present.
Create the main share
!!! warning
To get Hardlinks and Atomic-Moves working with your Synology you will need to make use of **ONE** share with subfolders.
We will use a new share named data (lowercase) for all your library media.
Later in this guide, we will fill this share with subfolders.
To create a new share:
Control Panel > Shared Folder > click Create > choose Create Shared Folder
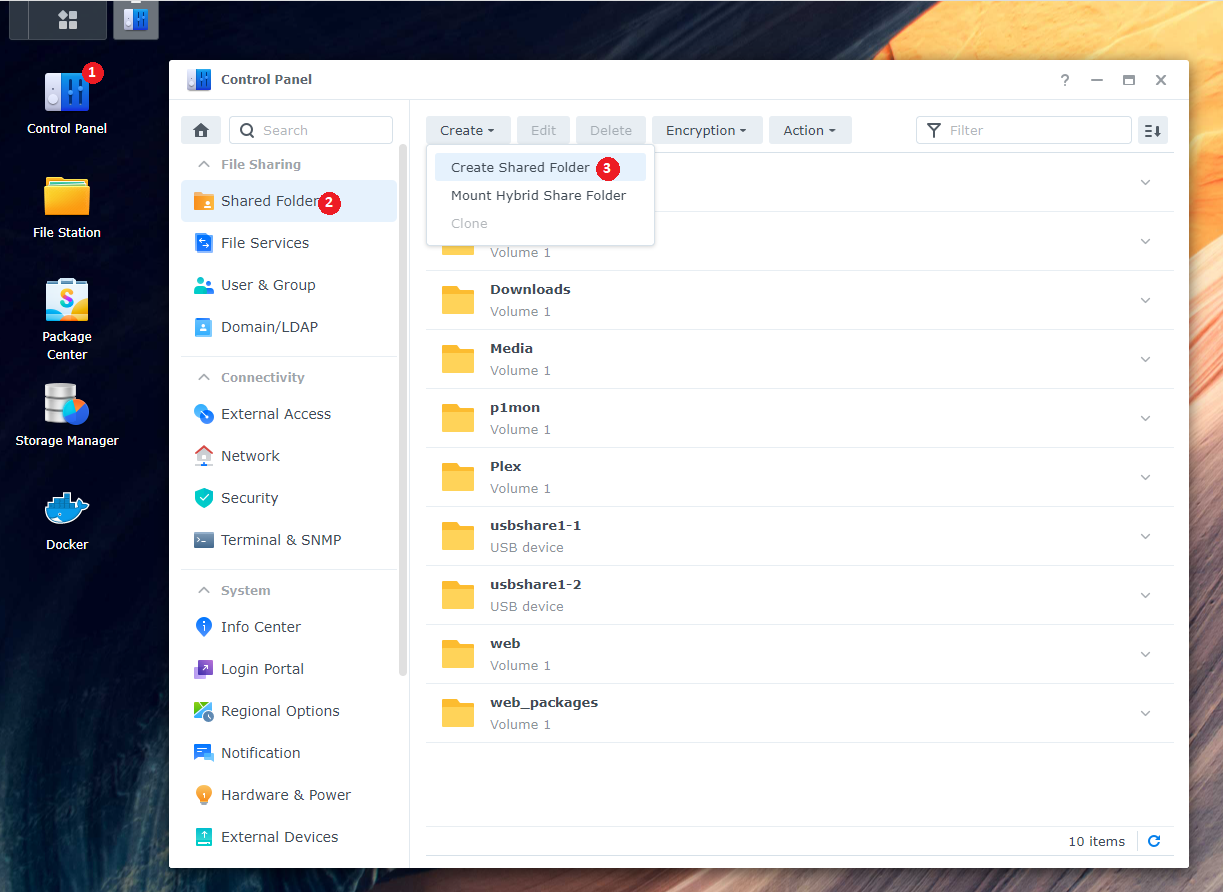
Name this shared folder data. You can disable the trash can. Click next until you are done.
Create a user
For this, we are going to create a new user that only has access to the share(s) that we use for this guide.
Go to Control Panel > User & Group
In the User section, create a new user. Name it whatever you like, but for this guide we will use docker.
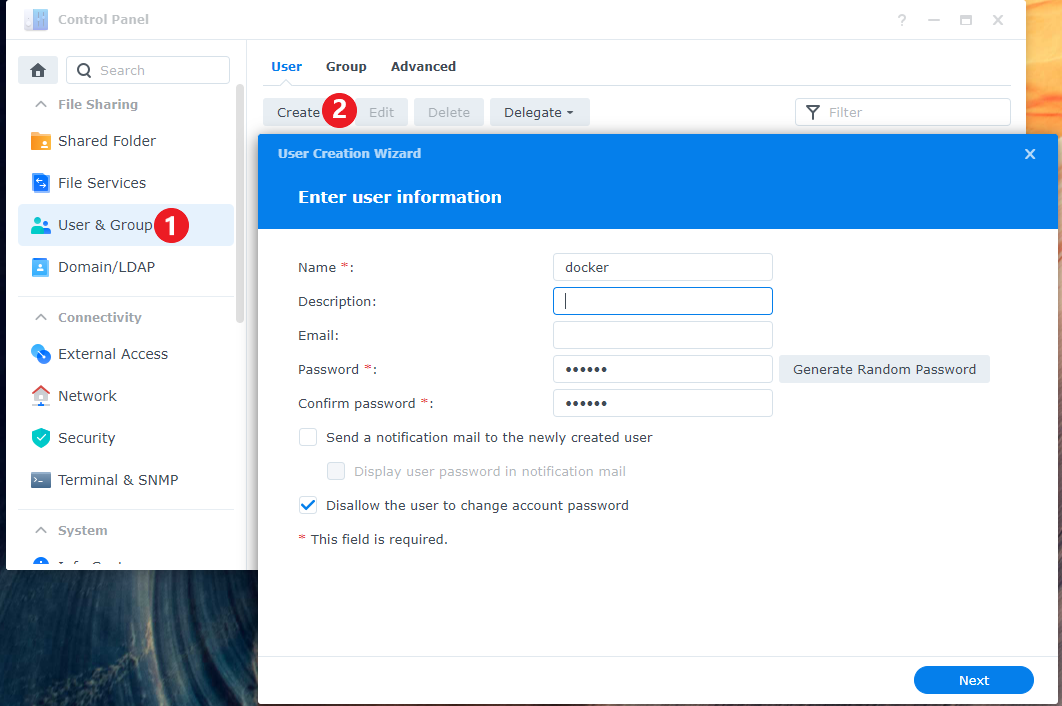
Fill out the rest of the information, generate a password or type your own.
Click next, you will now be able to select which group this user will belong to, it should only be users. Click Next.
Assign shared folder permissions
In this screen you will be able to select which Shares this user will have access to, click No Access on the top, this will deny all access.
Now only select Read/Write on the shares docker and data.
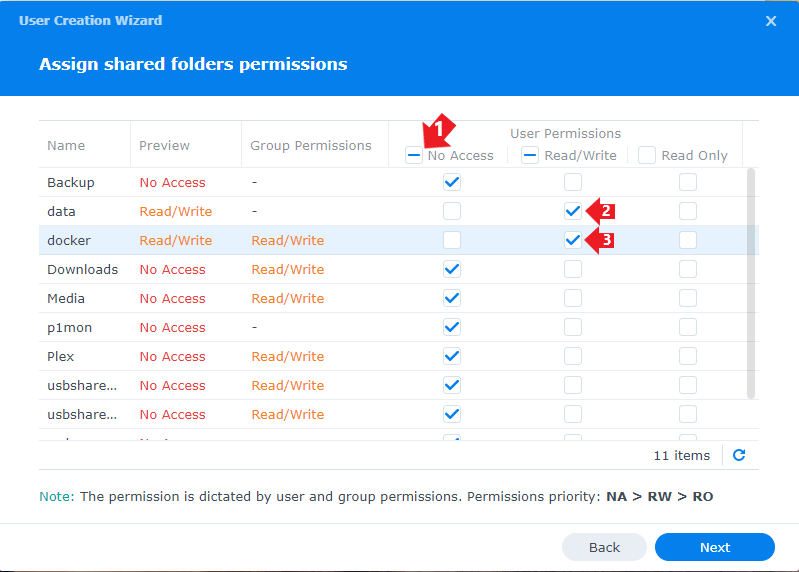
Click Next until you reach Assign application permissions
Assign application permissions
In this screen you will be able to select which application this user will have access to, Check Deny for all applications.
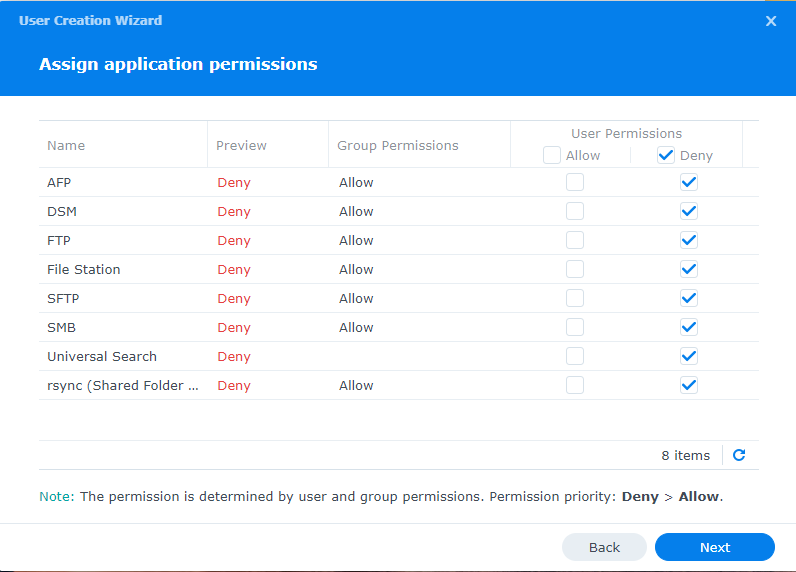
Continue to click Next until you are finished.
SSH
You are mostly going to use the terminal. Some parts will need the Synology web GUI. To enable terminal, you need to enable SSH in the Synology Settings.
Control Panel > Terminal & SNMP > Enable SSH service
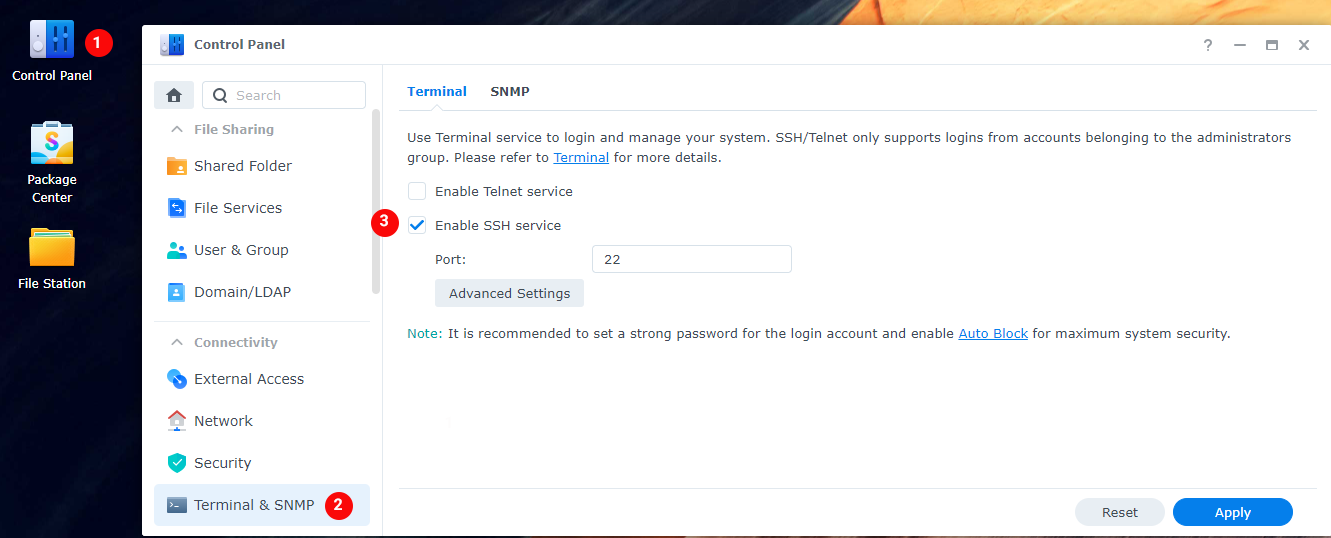
Then use a program like Putty{:target="_blank" rel="noopener noreferrer"} or Powershell/Terminal to SSH into your Synology.
Enter the login information of a Synology user account that has admin priveliges, as only members of the 'administrators' user group are able to use SSH.
If you get a popup asking if you want to trust the key,
Just press OK or ACCEPT
PUID and PGID
In order for the Docker container to access the shares on the Synology, we need to know the user ID (PUID) and group ID (PGID) from the docker user we just created.
Go into your terminal app, login to your synology ssh.
Once logged in type id $user. Change $user to the newly created username docker.

This will show you the UID (aka PUID).
Which in this screenshot is 1035 for the docker user
and the GID (aka PGID) which is 100 for the users group.
Remember these values for later use.
!!! warning
It is not recommended to use (anymore) your admin/main user account. That is why we just created a new user.
Folder Structure
For this example we're going to make use of the share called data.
On the host (Synology) terminal you will need to add /volume1/ before it. So /volume1/data
The data folder has sub-folders for torrents and usenet and each of these have sub-folders for tv, movie and music downloads to keep things neat. The library folder has nicely named tv, movies and music sub-folders, this is your library and what you’d pass to Plex, Emby or JellyFin.
These subfolders you need to create your self.
I'm using lower case on all folder on purpose, being Linux is case sensitive.
{! include-markdown "../../../includes/hardlinks/docker-tree-full.md" !}
{! include-markdown "../../../includes/hardlinks/bad-path-suggestion.md" !}
{! include-markdown "../../../includes/hardlinks/breakdown-folder-structure-synology.md" !}
Create the needed subfolder
Here we will create the needed subfolders for your media library and also for your preferred download client. If you use both then run both commands
If you use usenet
mkdir -p /volume1/data/{usenet/{incomplete,complete}/{tv,movies,music},media/{tv,movies,music}}
If you use torrents
mkdir -p /volume1/data/{torrents/{tv,movies,music},media/{tv,movies,music}}
Appdata
Your appdata will be stored in /volume1/docker/appdata/{appname}
These {appname} sub folders you need to create your self. (This is a limitation of the Synology)
We're going to do this in Putty or a similar program.
mkdir -p /volume1/docker/appdata/{radarr,sonarr,bazarr,plex,pullio}
You can add your own sub folders for your download client(s) using the command above, by adding the name to the command.
So your appdata folder will look like this.
ls -al /volume1/docker/appdata
docker
└── appdata
    ├── radarr
    ├── sonarr
    ├── bazarr
    ├── plex
    ├── pullio
    └── (your download client, i.e. nzbget; sabnzbd; qbittorrent)
Needed files
Now we are ready to move to the installation of containers.
For this, we need two files:
docker-compose.yml.env
We will start with downloading the docker-compose.yml file
Download this docker-compose.yml{:target="_blank" rel="noopener noreferrer"} to your /volume1/docker/appdata location so you got your important stuff together. Or use the command below:
wget https://raw.githubusercontent.com/TRaSH-/Guides-Synology-Templates/main/docker-compose/docker-compose.yml -P /volume1/docker/appdata/
Whats included and Whats not included
??? question "What's included and What's not included - [CLICK TO EXPAND]"
This docker-compose file will have the following docker containers included.

- Radarr
- Sonarr
- Bazarr (Subtitle searcher and downloader)
- Plex

What's not included (and where are the download clients?).

I didn't add a download client to it, because it depends on what you prefer (usenet/torrent) and which client you prefer, so I created a new [Repository](https://github.com/TRaSH-/Guides-Synology-Templates/tree/main/templates){:target="_blank" rel="noopener noreferrer"} on Github where I provide and maintain some templates that are ready to use with the main `docker-compose.yml`.

The only thing you need to do is copy/paste what's inside the `.yml` file in to the main `docker-compose.yml`, the template also has the command what you need to use to create the [appdata](#appdata) folder that we explained earlier.
Second we will download the .env file
Download this .env{:target="_blank" rel="noopener noreferrer"} to your /volume1/docker/appdata location so you got your important stuff together. Or use this command:
wget https://raw.githubusercontent.com/TRaSH-/Guides-Synology-Templates/main/docker-compose/.env -P /volume1/docker/appdata/
!!! warning
‼️ MAKE SURE THE FILE KEEPS THE ORIGINAL NAME .env WITH THE DOT BEFORE IT ‼️
Changes and preparations
!!! tip If you need to edit docker-compose.yml or the .env file we advise to use Notepad++{:target="_blank" rel="noopener noreferrer"} or Visual Studio Code{:target="_blank" rel="noopener noreferrer"}
The .env file we downloaded holds the variables/information you need to change in order for everything to work. I added explanations in the .env file.
- DOCKERCONFDIR (only change this if you know what you're doing and decide to use another path than this guide used)
- DOCKERDATADIR (only change this if you know what you're doing and decide to use another path than this guide used)
- PUID/PGID (this info you got earlier from HERE)
- TZ (Change to your timezone, can be found HERE{:target="_blank" rel="noopener noreferrer"})
- Install and Create a task scheduler for Pullio, so your containers stay up to date.
!!! info ""
The .env holds more variables/information for other containers you don't need to remove those variables and will be only used when you install the other containers.
Pullio - Auto update docker-compose the correct way
Pullio allows you to automatically update your containers. And send you a notification through various means. In my setup, I use a Discord Webhook.
First you need to download Pullio
sudo curl -fsSL "https://raw.githubusercontent.com/hotio/pullio/master/pullio.sh" -o /usr/local/bin/pullio
sudo chmod +x /usr/local/bin/pullio
For Pullio to work, you will need to create in your Task Scheduler a "Scheduled Task" that runs for example at 4am at night with root privileges.
Control Panel > Task Scheduler > click Create > choose Scheduled task - user defined script
Give the task a name so you know what it does. Choose user root.
In the Schedule tab choose whenever you want it to check for updates.
At Task Settings tab, add the following line in the Run Command section:
/usr/local/bin/pullio > /volume1/docker/appdata/pullio/pullio.log 2>&1
It can be frustrating to test the script if no docker image updates are available, for that you can run command sudo pullio --debug and the script will behave as if an update is available. If you have set to receive notifications, you should receive them.
More info about Pullio HERE{:target="_blank" rel="noopener noreferrer"}
Permissions
Now we need to make sure that the newly created files and folders have the correct permissions.
!!! note
If you're using a different user than docker (the user generated in the beginning), then you need to change the docker:users part in the commands below!!!
sudo chown -R docker:users /volume1/data /volume1/docker
sudo chmod -R a=,a+rX,u+w,g+w /volume1/data /volume1/docker
!!! note If you copy files from a different library into the newly created library, you need to rerun these commands. !!!
Run the Docker Compose
!!! tip make sure you delete/remove all your existing dockers from the Docker GUI and also remove your native installs (in Package Center) of these applications !!! If you had previous installed apps, make a backup of their config folders.
When you did all the above steps you only need to run the following commands:
cd /volume1/docker/appdata
sudo docker-compose up -d
You will notice that all the images will be downloaded, after that the containers will be started. If you get a error then look at the error what it says and try to fix it. If you still got issues then put your used docker-compose.yml on 0bin{:target="_blank" rel="noopener noreferrer"} and join the guides-discord here{:target="_blank" rel="noopener noreferrer"} and provide the pastebin link with the error, have patience because of timezone differences.
Don't forget to look at the Examples how to setup the paths inside your applications.
!!! warning
If you need to do any changes, only edit the `docker-compose.yml` file. To activate the changes, run the command `sudo docker-compose up -d` again, from within the `/volume1/docker/appdata` folder.

Any changes you do/did in the GUI will be reverted when you run the docker-compose command.

Just don't use the GUI, only for information purposes !!!
{! include-markdown "../../../includes/hardlinks/docker-compose-commands.md" !}
{! include-markdown "../../../includes/support.md" !}
Additional Synology Info
DSM Task for correctly reporting IP in Plex/Nginx/Etc
Due to some iptables configuration in DSM, you can incorrectly get IP reported in Plex or other apps that need an IP read. To fix this, you need to add two rules to your iptables. unfortunately, those rules can sometimes be deleted at reboot or after DSM update.
To fix this, you will need to add a Scheduled Task that executes at boot with root user, which will check if the rules exists, if not, re-add them.
??? question "Task bash command - [CLICK TO EXPAND]"
```bash
--8<-- "includes/hardlinks/docker-iptables-fix.sh"
```