6.8 KiB
ass
ass is a self-hosted ShareX upload server written in Node.js. I initially started this project purely out of spite.
Features
- ✔️ Token authorization via HTTP
Authorizationheader - ✔️ Upload images, videos, gifs, files
- ✔️ Fancy embeds on Discord
- ✔️ Seamless inline video embeds on Discord
- ✔️ Upload log via Discord Webhooks
- ✔️ File deletion
- ✔️ Multiple access types
- ZWS
- Mixed-case alphanumeric
- Original
- ❌ Thumbnail support
- ❌ Multiple database types
- JSON
- Mongo (soon!)
- MySQL (soon!)
- PostgreSQL (soon!)
- ❌ Multi-user support (upload restrictions, web library, etc.)
- ❌ Block-storage support including Amazon S3
- ❌ Usage metrics
Access types
| Type | What is it? |
|---|---|
| ZWS (Zero-width spaces) | The "fancy" mode. When pasted elsewhere, the URL appears to be just your domain name.  |
| Mixed-case alphanumeric | The "safe" mode. URL's are browser safe as the character set is just letters & numbers. |
| Original | The "basic" mode. URL matches the same filename as when the file was uploaded. This may be prone to conflicts with files of the same name. |
Installation
The installation may look daunting but it's really pretty straightforward. Just follow it word-for-word & you'll be fine. If you are not fine, then by all means open an Issue & I'll try my best to help.
- First of all you must have Node.js 14 or later installed. It might work with Node.js 12 but just use 14.
- Clone this repo using
git clone https://github.com/tycrek/ass.git && cd ass/ - Run
npm ito install the required dependencies - Run
npm run setupto start the easy configuration - Run
npm startto start the server. The first time you run it you will be shown your first authorization token; save this as you will need it to configure ShareX. - (Optional) You must also configure an SSL-enabled reverse proxy (only if you want to use HTTPS):
- I personally use Caddy, see my tutorial on setting that up
- You may also use Apache or Nginx as reverse proxies
Generating new tokens
If you need to generate a new token at any time, run npm run new-token. This will automatically load the new token so there is no need to restart ass.
Cloudflare users
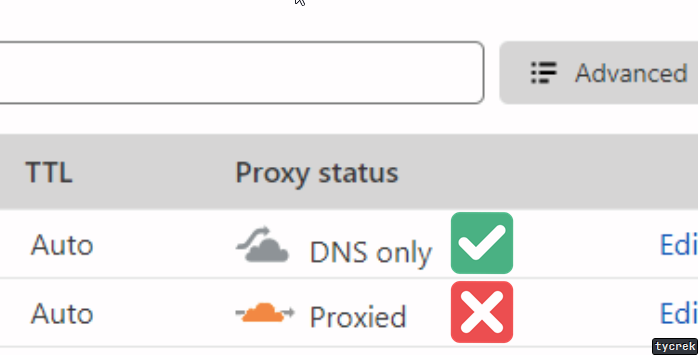
In your Cloudflare DNS dashboard, make sure your domain/subdomain is set to DNS Only.
Configure ShareX
- Add a new Custom Uploader in ShareX by going to
Destinations > Custom uploader settings... - Under Uploaders, click New & name it whatever you like.
- Set Destination type to
Image,Text, &File - Request tab:
- Method:
POST - URL:
https://your.domain.name.here/ - Body:
Form data (multipart/form-data) - File from name:
file(literally put "file" in the field) - Headers:
- Name:
Authorization - Value: (the value provided by
npm starton first run)
- Name:
- Method:
- Response tab:
- URL:
$json:.resource$ - Deletion URL:
$json:.delete$ - MagicCap users: do not include the
.in the above (i.e.$json:resource$)
- URL:
- The file
sample_config.sxcucan also be modified & imported to suit your needs
Header overrides
If you need to override a specific part of the config to be different from the global config, you may do so via "X" HTTP headers:
| Header | Purpose |
|---|---|
X-Ass-Domain |
Override the domain returned for the clipboard (useful for multi-domain hosts) |
X-Ass-Access |
Override the generator used for the resource URI. Must be one of: original, zws, or random (see above) |
Fancy embeds
If you primarily share media on Discord, you can add these additional (optional) headers to build embeds:
| Header | Purpose |
|---|---|
X-Ass-OG-Title |
Large text shown above your media |
X-Ass-OG-Description |
Small text shown below the title but above the media (does not show up on videos yet) |
X-Ass-OG-Author |
Small text shown above the title |
X-Ass-OG-Color |
Colour shown on the left side of the embed. Must be either a hex colour value (for example: #fe3c29) or &random |
Embed placeholders
You can insert certain metadata into your embeds with these placeholders:
| Placeholder | Result |
|---|---|
&size |
The files size with proper notation rounded to two decimals (example: 7.06 KB) |
&filename |
The original filename of the uploaded file |
×tamp |
The timestamp of when the file was uploaded (example: Oct 14, 1983, 1:30 PM) |
Webhooks
You may use Discord webhooks as an easy way to keep track of your uploads. The first step is to create a new Webhook. You only need to follow the first section, Making a Webhook. Once you are done that, click Copy Webhook URL. Next, paste your URL into a text editor. Extract these two values from the URL:
https://discord.com/api/webhooks/12345678910/T0kEn0fw3Bh00K
                                 ^^^^^^^^^^  ^^^^^^^^^^^^
                                 Webhook ID  Webhook Token
Once you have these, add the following HTTP headers to your ShareX config:
| Header | Purpose |
|---|---|
X-Ass-Webhook-Client |
The Webhook ID |
X-Ass-Webhook-Token |
The Webhook Token |
X-Ass-Webhook-Username |
(Optional) the "username" of the Webhook; can be set to whatever you want |
Webhooks will show the filename, mimetype, size, upload timestamp, thumbail, and a link to delete the file. To disable webhooks, simply remove the headers from your config.
Contributing
No strict contributing rules at this time. I appreciate any Issues or Pull Requests.


